Last-Minute Bali Visa Extension: What to Do If Your Permit Expires Today
If your Bali stay permit expires today, contact Visa BaliEasy immediately—even if you discover the problem late at night. An


Quick answer: For an international flight to Bali, prepare your passport, the visa or entry permission appropriate to your nationality, your All Indonesia Arrival Card QR code, and your Bali Tourist Levy voucher if applicable. Keep your return/onward ticket and accommodation details ready too.
Portal walkthrough checked on 3 November 2026. All Indonesia is free to complete on the official government portal.
| Document or information | What to prepare |
|---|---|
| Passport | Travel with the same passport used for your visa and arrival card. The official visitor-visa guidance requires at least six months of passport validity on arrival; check the rules for your own passport and entry category. |
| Visa or valid entry basis | Keep your approved eVisa or stay-permit documents available, or confirm that you qualify for visa on arrival or visa exemption. An arrival-card QR code does not grant a visa. |
| All Indonesia Arrival Card | Complete the declaration within the permitted pre-arrival window and save the confirmation/QR code offline. |
| Bali Tourist Levy | For foreign tourists visiting Bali, keep the levy voucher or applicable exemption evidence. Check the current policy on Love Bali. |
| Return/onward ticket | Have evidence of your transportation out of Indonesia ready, as required by your visa or entry category. This is listed in the official visitor-visa arrival requirements. |
| Flight and accommodation details | Prepare your arrival flight number, arrival/departure dates, hotel or other accommodation name, address and booking details. For connections, use the flight that actually enters Indonesia. |
Save the QR code, visa and levy voucher where you can access them without mobile data. Keep any additional documents required for your specific visa, special goods or travel circumstances; the checklist does not replace those requirements.
All Indonesia Arrival Card is a new digital arrival declaration that everyone entering Indonesia must complete, including both foreign visitors and Indonesian citizens.
It replaces several older forms by combining the immigration arrival card, the customs e-CD, and previous health or quarantine declarations into one unified online process.
The system is managed by the Directorate General of Immigration (Ditjen Imigrasi) and can be accessed through All Indonesia official website or the All Indonesia mobile app.
On the official e-Visa site, Immigration now clearly states:
“Arrival Card Submission is Required. All travellers are required to submit an arrival card within 3 (three) days prior arrival in Indonesia.”
The requirement has been in effect since the official announcement on 1 October 2025.
View this post on Instagram
All international passengers, including:
Use Add Traveller on the Personal Information page to include another person. Enter each person’s own passport details, including children’s details. The official Help Center limits a group to 10 travellers and says Indonesian-passport travellers and foreign-passport travellers must use separate submissions. Check the final records for everyone included rather than assuming one person’s details cover the whole family.
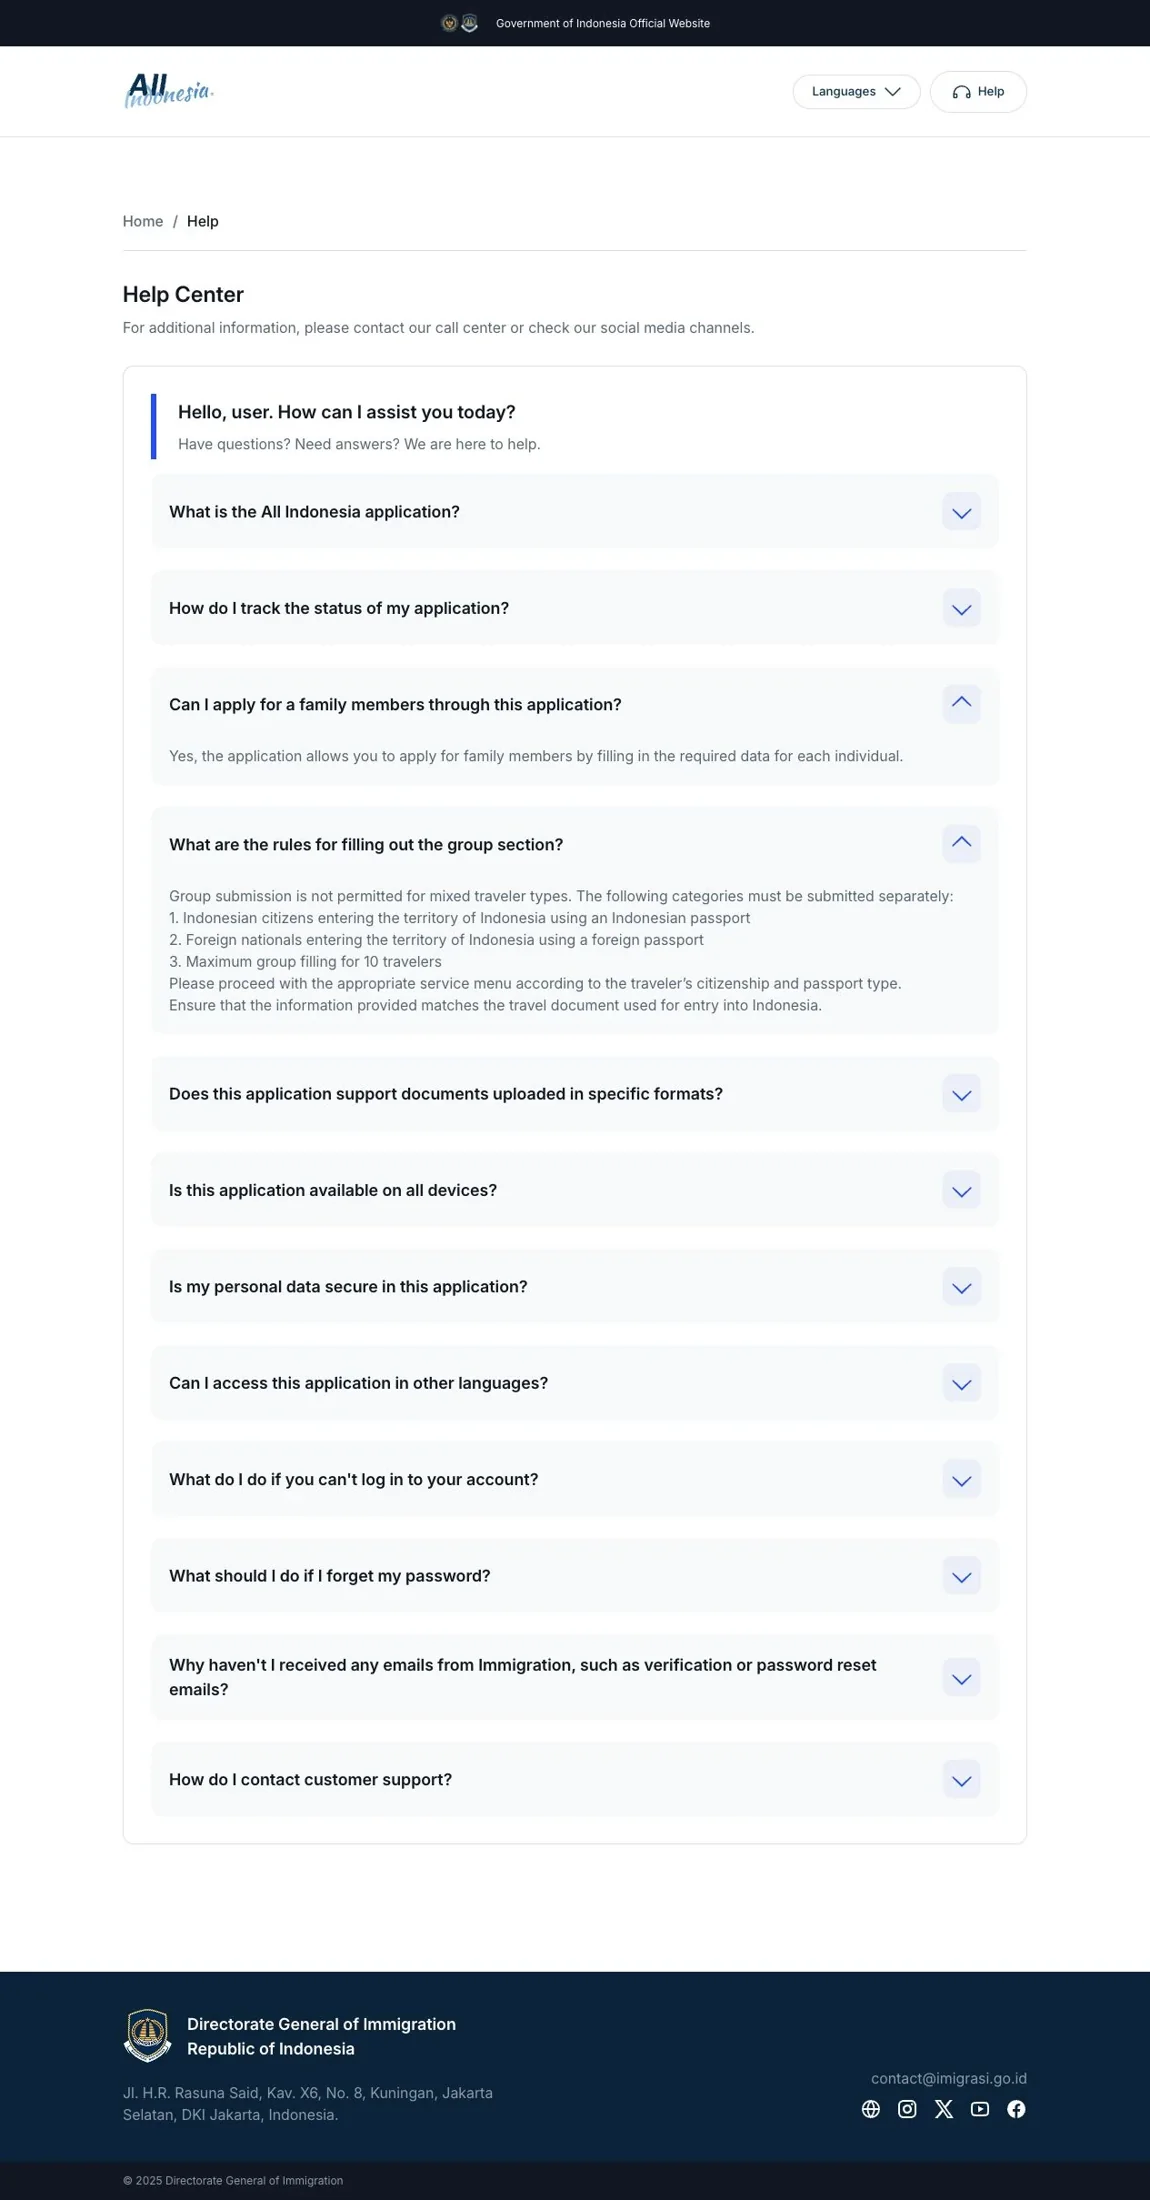
Many travelers wonder whether the new All Indonesia Arrival Card is the same as Indonesia’s customs declaration. Here’s the difference:
For arrivals by air or sea, the routine customs declaration is integrated into All Indonesia, so you do not complete a second, separate e-CD for the same arrival. Indonesian Customs guidance still directs land-border arrivals and certain outbound declarations to e-CD. This distinction matters if your route is not an international flight or sea arrival.
Read more: Indonesia customs declaration: goods, allowances and restricted items
For a normal arrival by air or sea, complete All Indonesia rather than a separate routine e-CD, health or quarantine arrival declaration. Those sections are now combined in one process. You must still answer the customs and quarantine questions inside All Indonesia. A visa, the Bali levy, or a permit needed for particular goods remains separate; follow any specific instructions from the authorities.
1. Passport information
2. Flight information
3. Purpose of visit
4. Address in Indonesia
5. Information on goods carried (animals, fish, plants, and derivative products)
Also have your passport expiry, email address, mobile number, visa/stay-permit number if applicable, recent country/transit history, seat number and baggage count available. The form changes according to your selected transport and accommodation type.
The website currently has four form stages: Personal Information, Travel Details, Mode of Transportation & Address, and Declaration. The seven steps below explain those stages, including the health, quarantine and customs sections within Declaration.
About the screenshots: Visa BaliEasy tested the public website using fictional details such as ALEX EXAMPLE and TEST00001. The dates, flight number, visa number and hotel selection demonstrate the fields only. Do not copy them into your own application. No dummy declaration was certified or submitted, so this guide does not display an issued dummy QR code.
Visit allindonesia.imigrasi.go.id, or use the All Indonesia mobile app. Choose your language, then select Foreign Visitor or Indonesian Citizen according to the passport you will use to enter Indonesia. This illustrated example follows the Foreign Visitor website route.
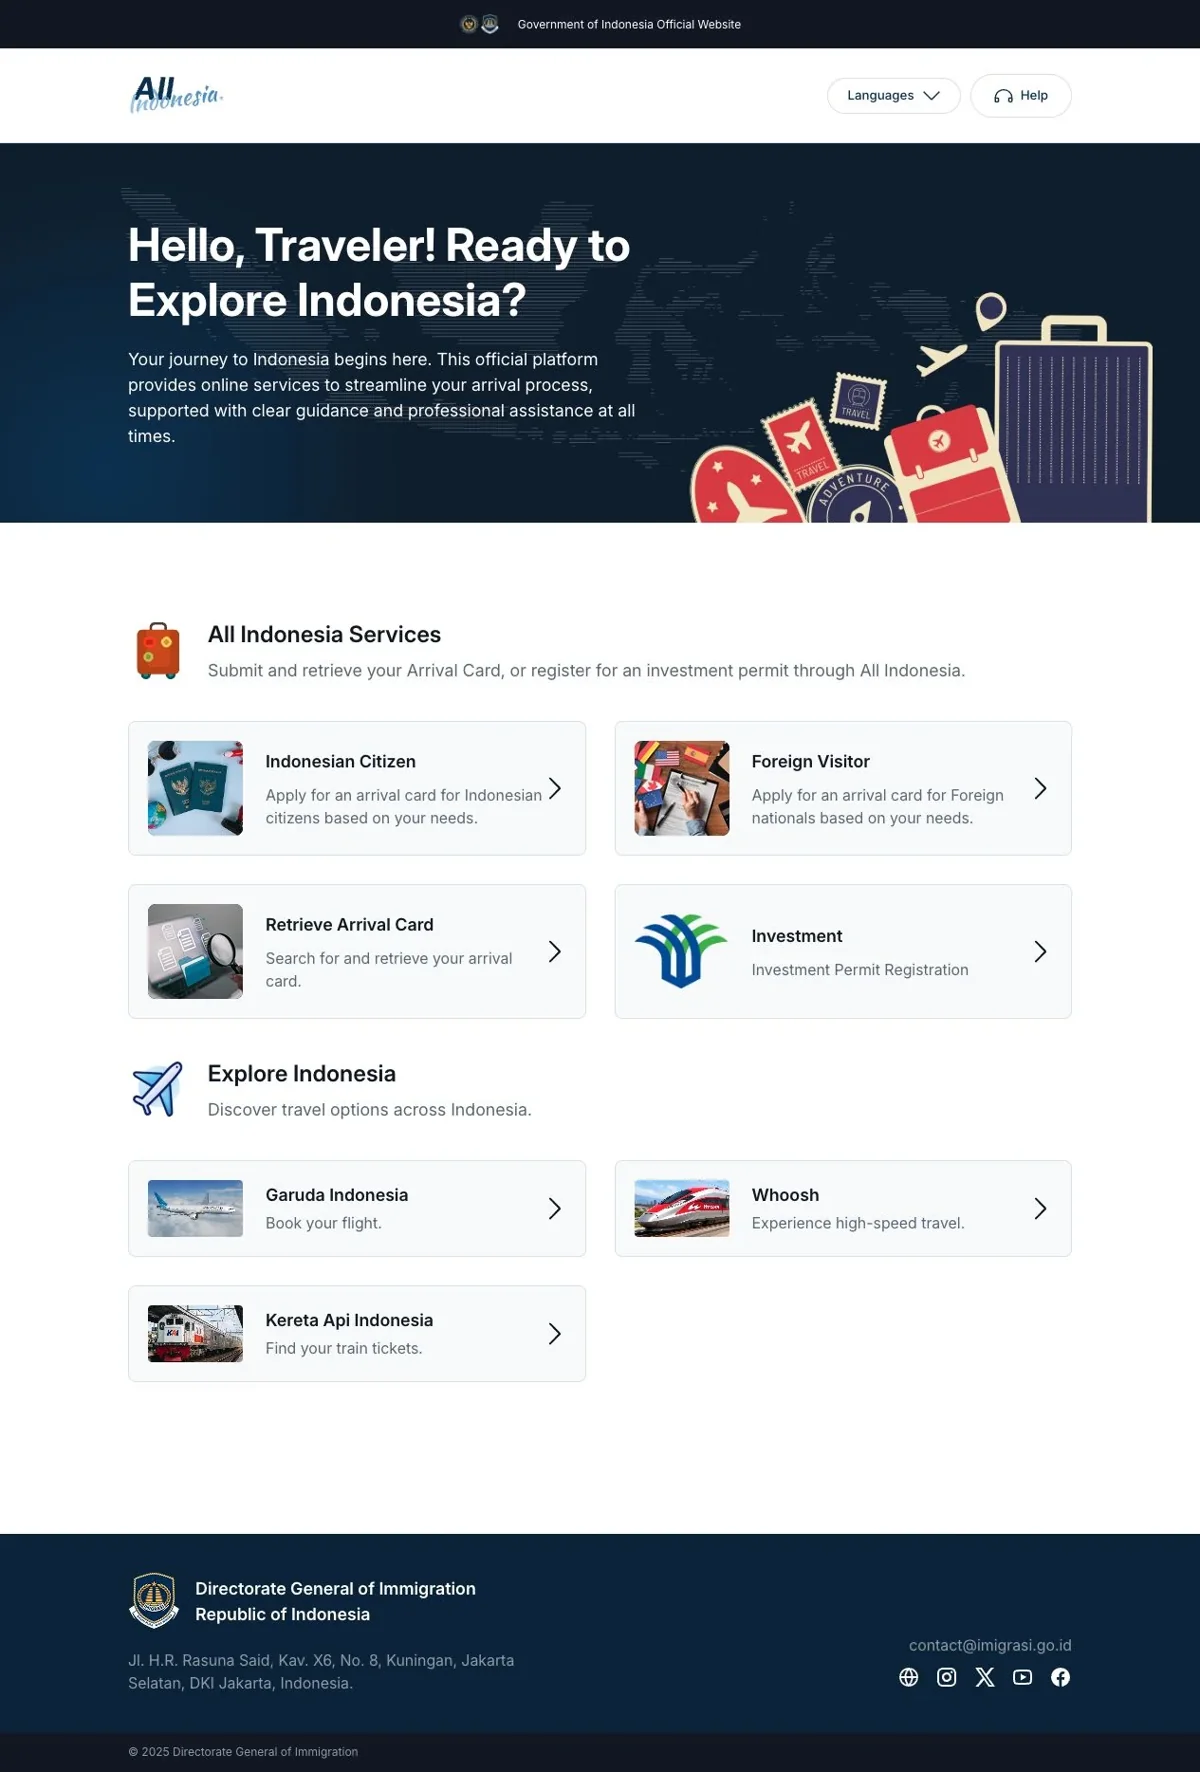
Fill in your passport country/region, full name, date and country/place of birth, gender, passport number and passport expiry. You may enter the details manually or use Scan MRZ, then check every result against your passport. Use the same passport as for your visa and other immigration applications.
Answer the question about any previous entry using a passport of a different nationality/region, then enter your accessible mobile number and email address. Use Add Traveller for eligible family/group members. Check each person before clicking Next.
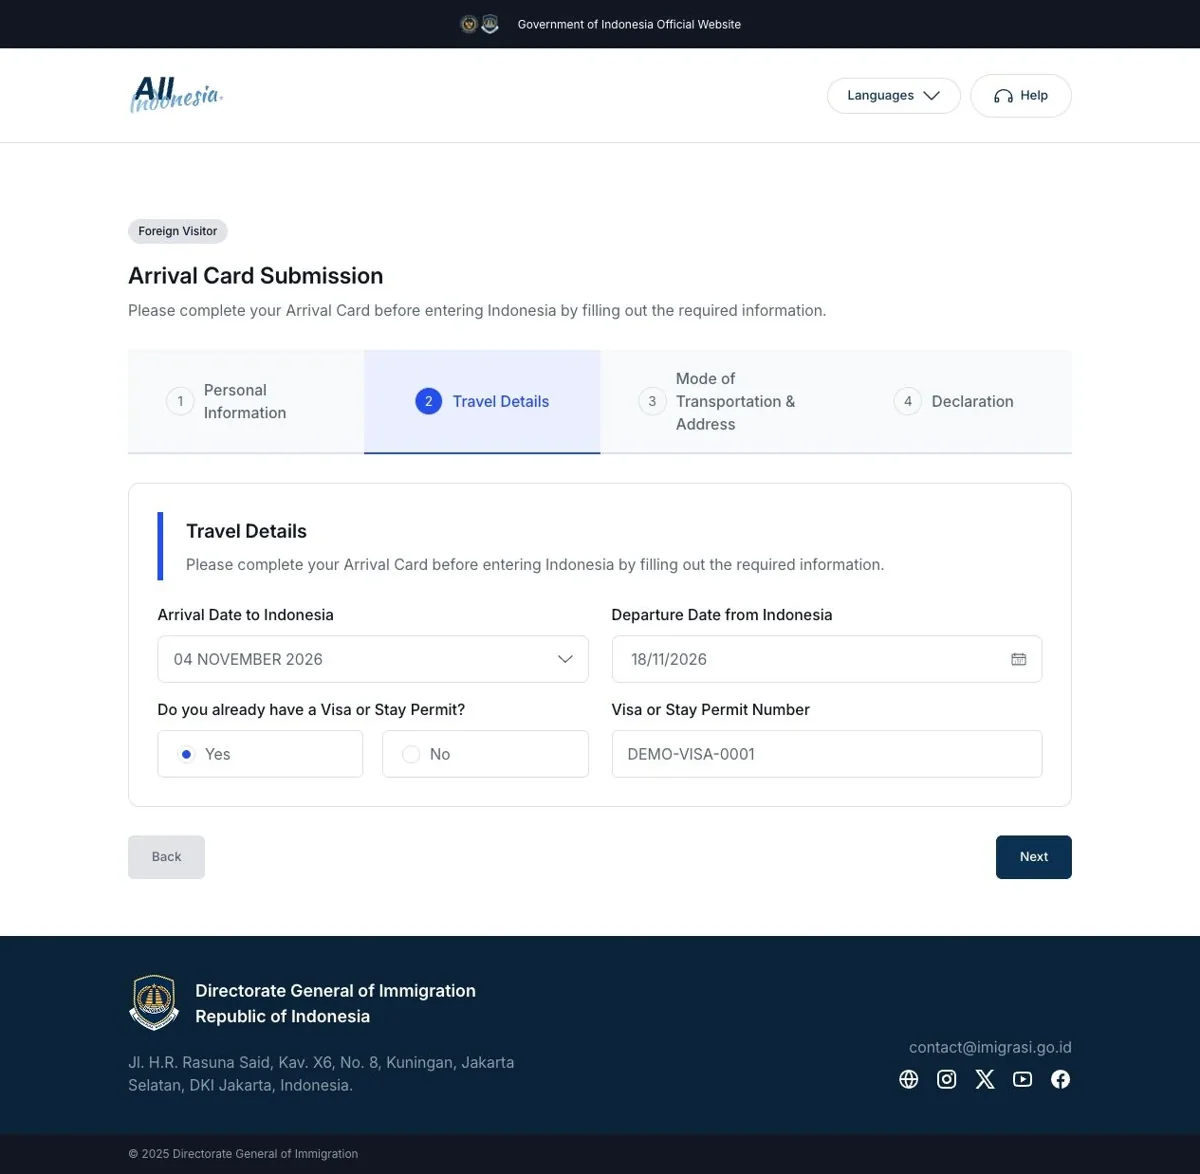
On Travel Details, select your arrival date from the available dates and enter your departure date. Answer whether you already have a visa or stay permit. Selecting Yes reveals a field for its number; copy the number from your actual document. Click Next. Your travel purpose is selected on the following transport page.
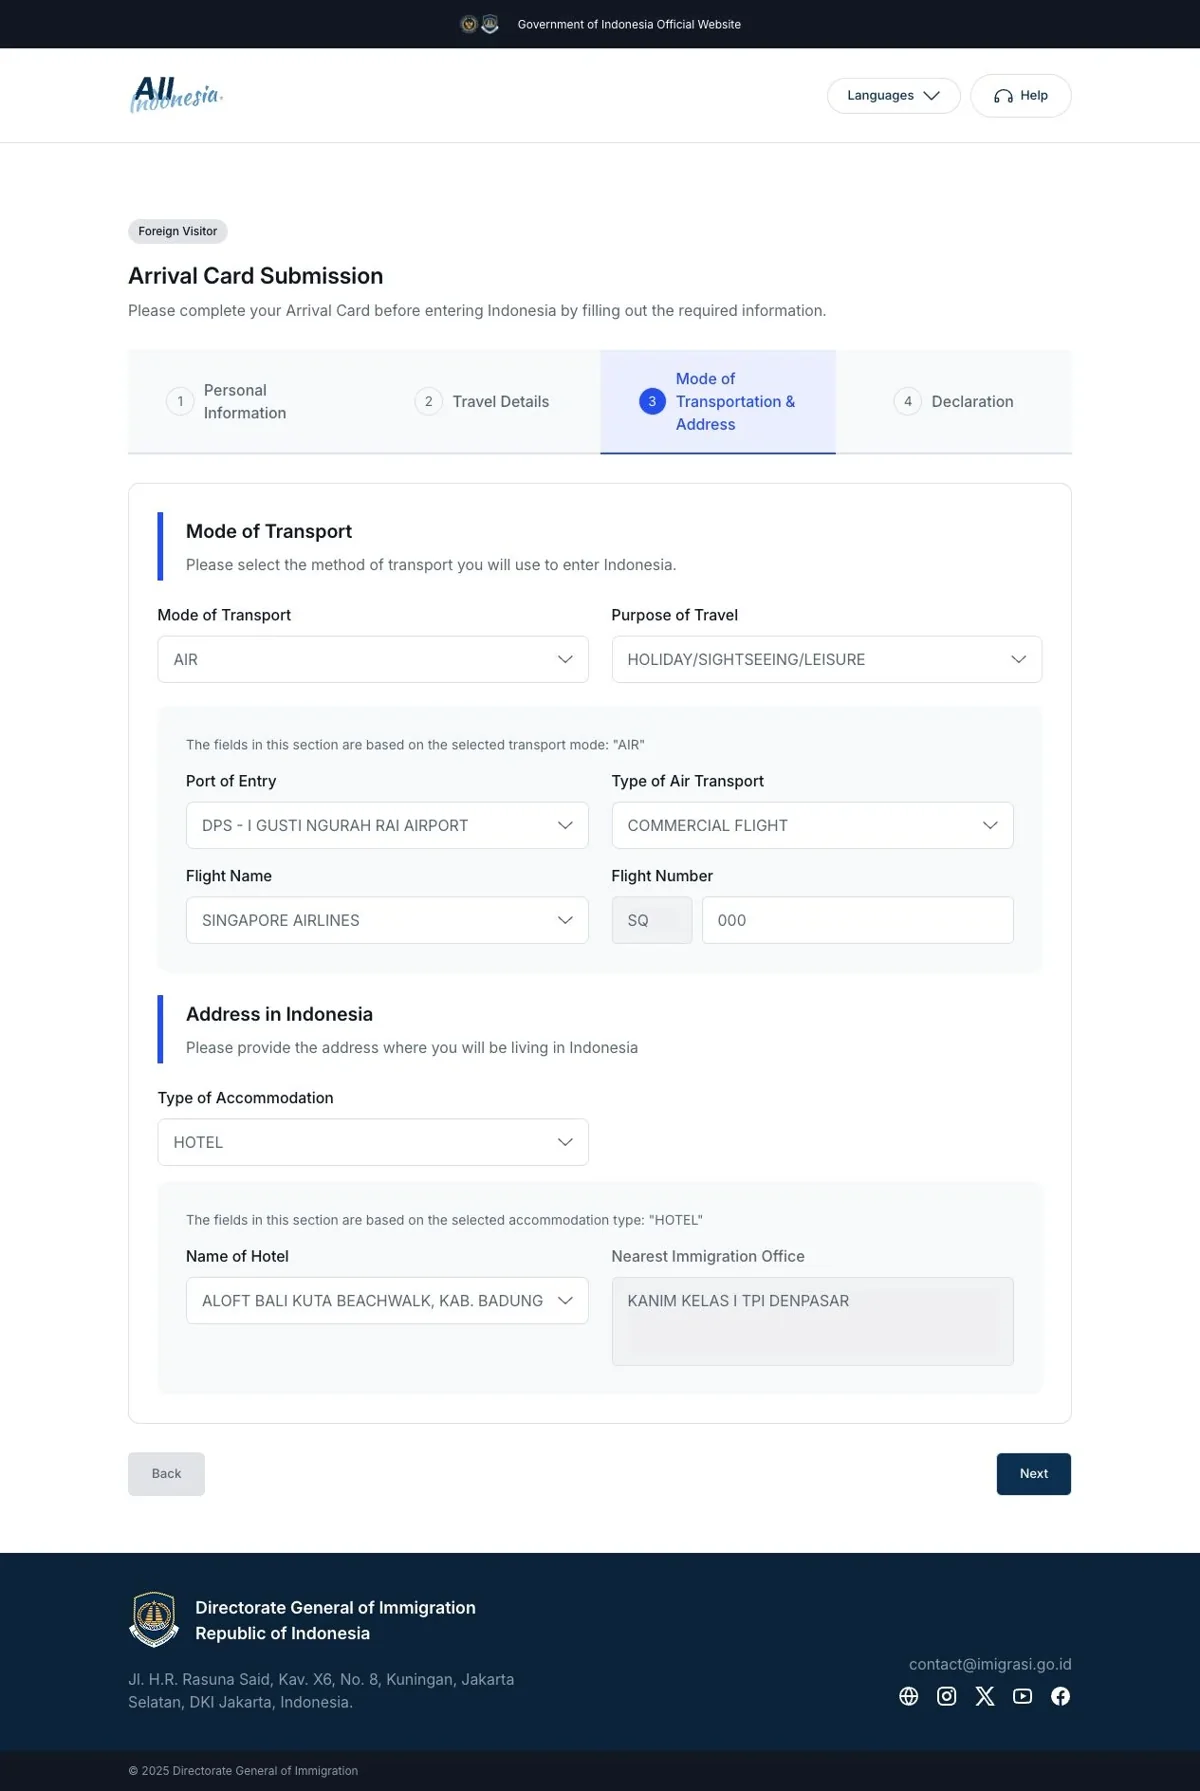
Select your transport mode and the purpose that matches your visit. For an international flight to Bali, the illustrated route uses AIR, DPS – I GUSTI NGURAH RAI AIRPORT, the relevant air-transport type and your airline. The portal fills the airline code separately; enter the flight-number portion requested in its own field.
If you connect through Jakarta or another Indonesian airport, use the airport where you first enter Indonesia and the international flight arriving there, rather than treating the later domestic flight to Bali as your international entry.
Choose the accommodation type that describes your stay. In the HOTEL route shown here, search for and select the actual property. Other accommodation types can display different fields. Check the property’s location and booking details carefully. Do not select an unrelated hotel just to proceed; consult official help if you cannot identify the correct option. Click Next when your transport and accommodation details are complete.
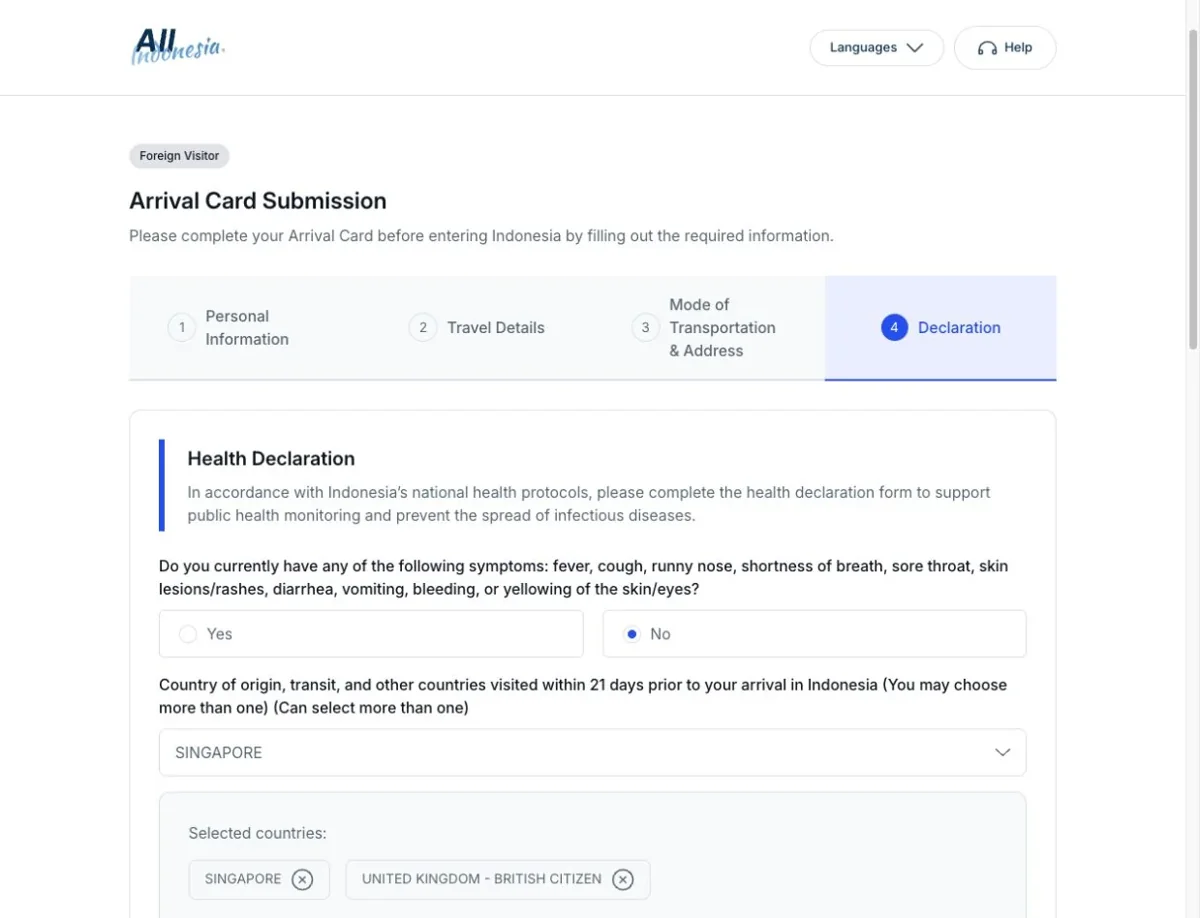
The Declaration stage begins with Health Declaration. Answer the symptom question according to your actual condition. Select your country of origin, transit countries and any other countries visited in the 21 days before arrival; the field allows multiple selections. Enter your seat number in the field provided.
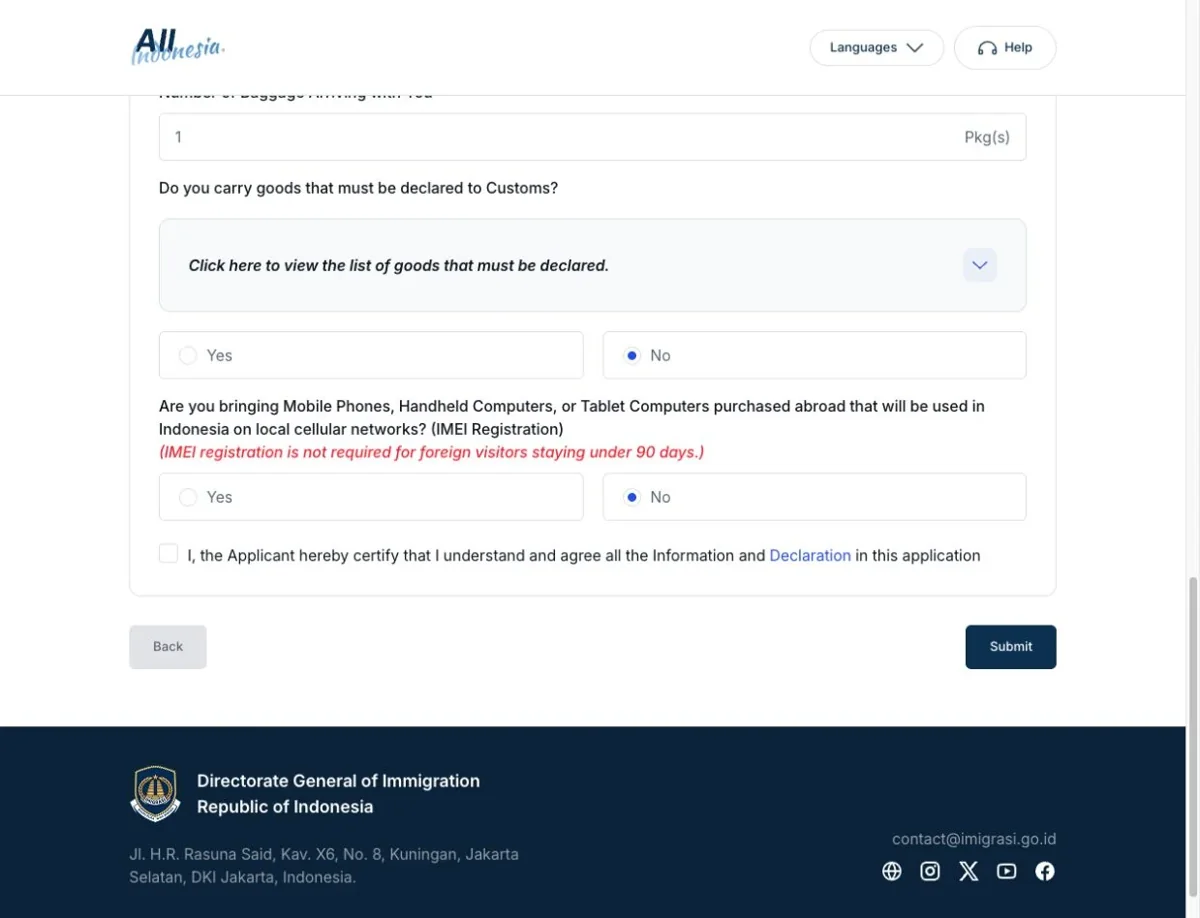
Continue down the same Declaration page. Open the information panels before answering the quarantine and customs questions. Declare any animals, fish, plants or processed products as required, enter your baggage count, and answer whether you carry goods that must be declared to Customs.
Read the device/IMEI question and its eligibility note. The portal currently states that IMEI registration is not required for foreign visitors staying under 90 days. Check the official Customs guidance for your device and intended use. The example answers shown are not recommended answers for every traveller: report your own goods and circumstances truthfully.
For detailed goods rules, read our Indonesia customs-declaration guide.
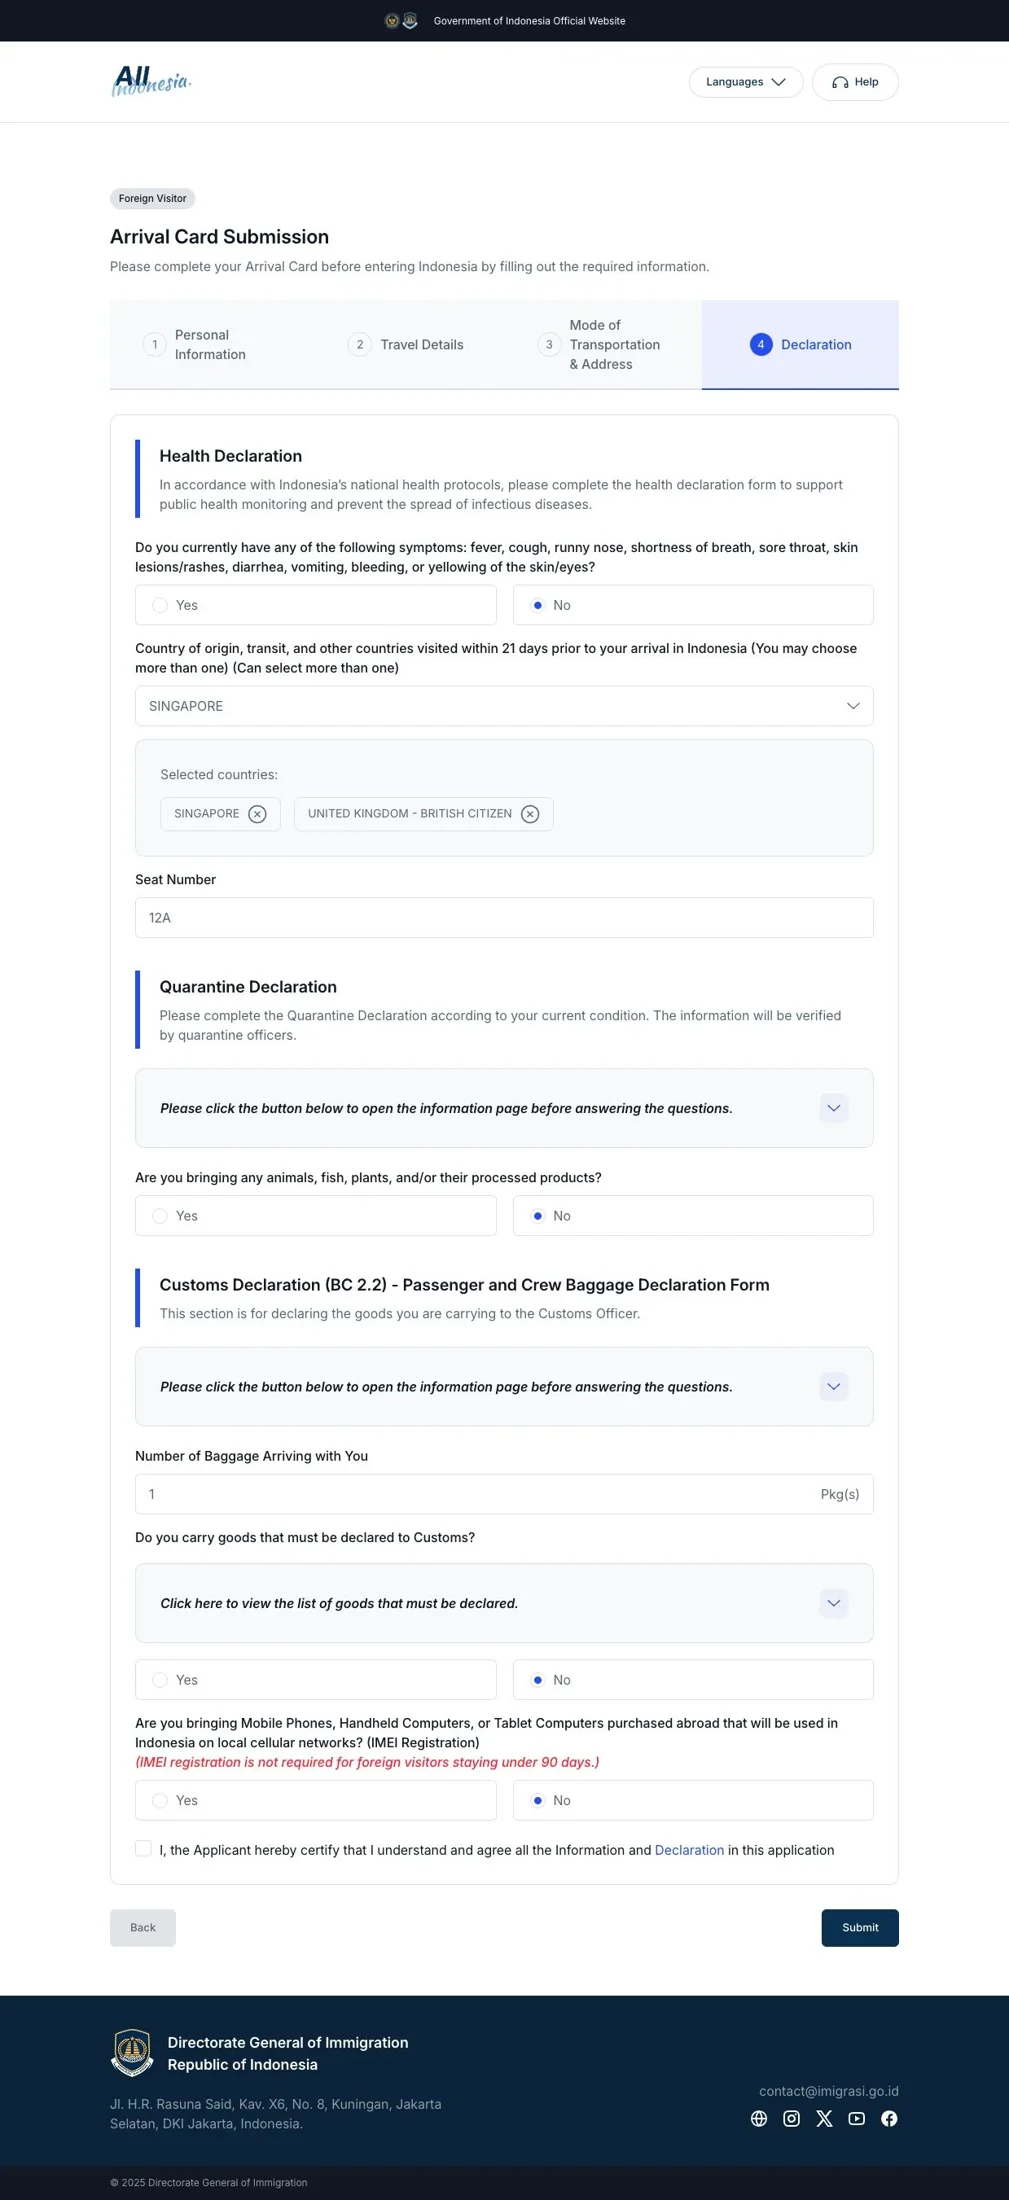
Review every traveller’s passport data, dates, flight and accommodation details, and declaration answers. Use Back to revisit earlier pages if needed. Once your real information is complete and correct, read the final information/declaration statement, confirm it and select Submit.
After a successful real submission, save the resulting arrival-card confirmation and QR code for the arrival checks. Keep it available offline alongside your travel documents. If you cannot find it later, use the official retrieval service explained below.
The screenshot below shows the final control before submission. The certification remains unchecked because the displayed information is fictional; it is not an issued arrival card.
View this post on Instagram
Many travelers confuse the All Indonesia Arrival Card with a visa, but they are two completely different requirements:
If you are considering long-term residency, you can also explore the Indonesia Golden Visa.
If you are traveling to Bali, it’s important to understand that the All Indonesia Arrival Card and the Bali Tourist Levy are two separate requirements.
Completing the All Indonesia Arrival Card does not replace the Bali Tourist Levy.
Even if you have already submitted the Arrival Card and received your QR code, foreign tourists visiting Bali still need to address the Bali Tourist Levy separately unless an exemption applies. Keep the levy voucher or relevant exemption evidence available. Check the official exemption guidance for your circumstances.
The Arrival Card is a free arrival declaration for immigration, customs, health and quarantine information. The Bali Tourist Levy is a separate local tourism contribution for foreign tourists visiting Bali, subject to exemptions. Its voucher and the All Indonesia QR code are different records. See our step-by-step Bali Tourist Levy payment guide.
You can complete the declaration after landing by scanning the QR code provided at the airport and using the airport’s Wi-Fi.
You can still fill it out once you arrive at the airport, but be prepared for possible delays. Some airports provide self-service kiosks, though availability and convenience differ. It’s highly recommended to submit the form before your trip.
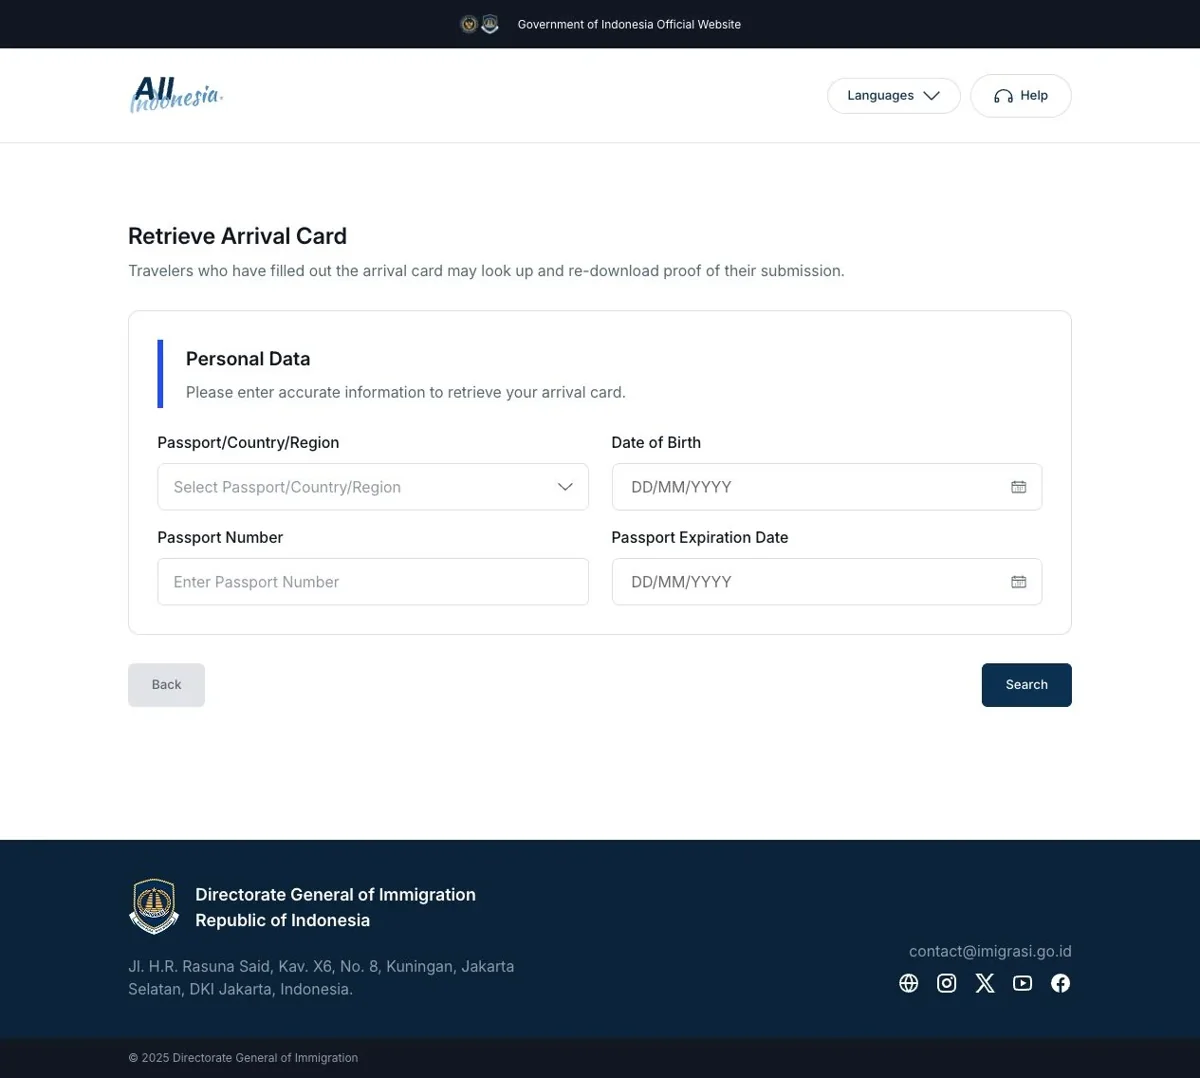
Already submitted but cannot find the confirmation? Open the official Retrieve Arrival Card page. This service looks up and re-downloads an existing submission.
If no record appears, compare every field with the original passport and submission. Consult the official Help Center if you still cannot locate it; avoid creating duplicate declarations just to find a missing QR code.
Use the manual-entry fields where available. Check the name, passport number, nationality and dates carefully before continuing. A scan error is not a reason to use an approximate value. For an unresolved technical problem, use official help and avoid posting passport details publicly.
First retrieve your existing record and check the correction options currently offered by the portal. If you cannot identify how to amend an important detail, contact the official Help Center before making another submission. Do not assume that every field can be edited after submission or that a new record automatically replaces the old one.
Yes. Having an eVOA or VOA does not replace the Arrival Card requirement. Your visa only grants entry permission, while the All Indonesia Arrival Card is a mandatory declaration form for immigration, customs, and health data. Even with an approved eVOA or VOA, you must still complete the Arrival Card before arriving in Indonesia.
If you plan to stay longer, you can extend your EVOA/VOA by following How to Extend EVOA/VOA guide.
You may also be required to complete biometric data during the extension process if you extend your visa.
After submitting your declaration, the system generates a QR code. This code is scanned by officers at immigration, health, and customs checkpoints to verify your digital submission.
The term “e-Arrival Card” refers to the digital arrival declaration completed through the “All Indonesia” platform. It is the modern, electronic version of the previous paper arrival card.
Yes. The All Indonesia declaration is compulsory for all international arrivals, regardless of nationality, visa type, or travel purpose. Group submissions are allowed, but every traveler’s details must still be entered correctly.
Only if you enter Indonesia (i.e., pass immigration). If you remain in the international transit area without clearing immigration, you do not need to submit the Arrival Card.
Yes. You can assist and fill the declaration on their behalf, as long as you enter each person’s correct passport and travel details. They do not need separate logins or accounts.
If you also need assistance arranging your Indonesian visa, Visa BaliEasy offers fast and reliable processing for popular options like the eVOA, C1/211A, eVOA Extension, and C1/211A Extension. Our team ensures your documents are accurate and your application is handled smoothly, so you can focus on enjoying your trip to Indonesia.
If your Bali stay permit expires today, contact Visa BaliEasy immediately—even if you discover the problem late at night. An
If you’re currently in Bali on a C1 Tourist Visa and want to extend your stay for another 120 days,